The No‑Pull Dog Harness Guide: Fit, Training, and Safety
Meta description: Learn how no‑pull dog harnesses work, how to fit them correctly, when to use front‑clip vs back‑clip, and simple training steps that protect your dog’s shoulders and your arms.
Walking should be relaxing for both you and your dog, but pulling can make every outing feel like a tug‑of‑war. A no‑pull harness won’t teach perfect leash manners on its own, yet it’s a helpful tool when you know how to choose and fit it. In this guide, we’ll explain how no‑pull designs work, which clips to use, how to measure a wriggle‑friendly fit, and the training steps that turn a frantic walk into a calm routine. We’ll also cover safety notes for growing puppies and brachycephalic breeds.
Quick resources: browse our dog harness collection and compare fabrics in How to Wash Pet Bedding & Apparel.
How no‑pull harnesses work
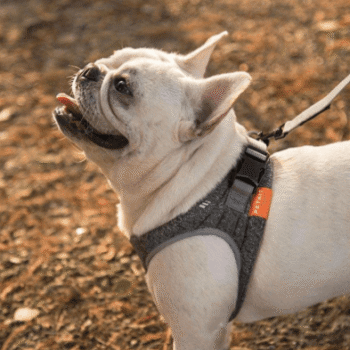
Most no‑pull styles use a front clip at the chest. When a dog surges forward, the leash angle gently redirects the body sideways, interrupting momentum without choking the trachea. Some designs add a Y‑shaped front to preserve shoulder range of motion, which is healthier than T‑straps that can press on soft tissue.
Front‑clip vs back‑clip
- **Front‑clip**: best for training new leash manners and for strong pullers. Encourages turning and attention.
- **Back‑clip**: comfortable for calm walkers, jogging, or long leads. Combine with a short training tab on the front ring during the learning phase.
- **Dual‑clip**: attach to a two‑ended leash to steer from the chest while distributing load across the back.
Measuring for a pain‑free fit
A good fit prevents rubbing and keeps the hardware stable. Measure with a soft tape:
- **Girth**: around the deepest part of the chest behind the front legs.
- **Neck/Chest panel**: from the sternum, over a shoulder, to the top of the back.
- **Back length**: base of neck to just behind the shoulder blades (where a back clip sits).
Aim for two stacked fingers under the straps—snug but not tight. Straps should create a Y that clears the windpipe and allows shoulder extension. Check again after a 10‑minute walk; dogs “settle” into a harness and you may need a minor adjustment.
Need help measuring? Save this and read our size notes in Orthopedic Dog Beds: How to Choose for joint‑friendly tips that also apply to harness comfort.
Training plan: 10 minutes a day
A harness controls physics, but training changes habits. Try this simple loop three to five times per walk:
- **Stand still** when your dog forges ahead—the tree technique.
- The moment the leash slackens, **mark** (“yes!”) and **reward** next to your left or right knee.
- **Turn** and take three slow steps; reward again for following.
- Layer in a cue like “Let’s go.”
Short, clean reps build success faster than exhausting marathons. If your dog is highly excited, start with 60 seconds of sniffing on cue to lower arousal, then switch to working mode.
For puppies and sensitive dogs
- Use **lightweight webbing** and flat seams to avoid rubbing puppy fur.
- Avoid head halters for brachycephalic breeds; a **front‑clip Y‑harness** is kinder.
- Keep sessions short and end with success—one great minute beats ten messy ones.
Troubleshooting
- **Chafing behind the armpits** → the chest strap sits too low; raise the torso panel and loosen the girth slightly.
- **Dog bunny‑hops or refuses to walk** → front panel too tight or rubbing the elbow; check range of motion indoors.
- **Still pulling after two weeks** → increase reinforcement rate and use a dual‑clip with a two‑ended leash temporarily.
Safety checklist
- Inspect stitching and buckles every month.
- Wash salt, mud, and sand regularly (see washing guide).
- Reflective trim for night walks; attach ID to the harness as well as the collar.
With the right fit and a few predictable habits, a no‑pull harness becomes a comfort tool rather than a crutch. Start small, reward generously, and enjoy quiet, shoulder‑friendly walks.